Pendulum with a pen презентация
Содержание
- 2. Step 1. Create a new layer over a layer "Pendulum" and
- 4. By means of the instrument of the free transformation of Free
- 5. Step 3. As a binding element between a pen and a
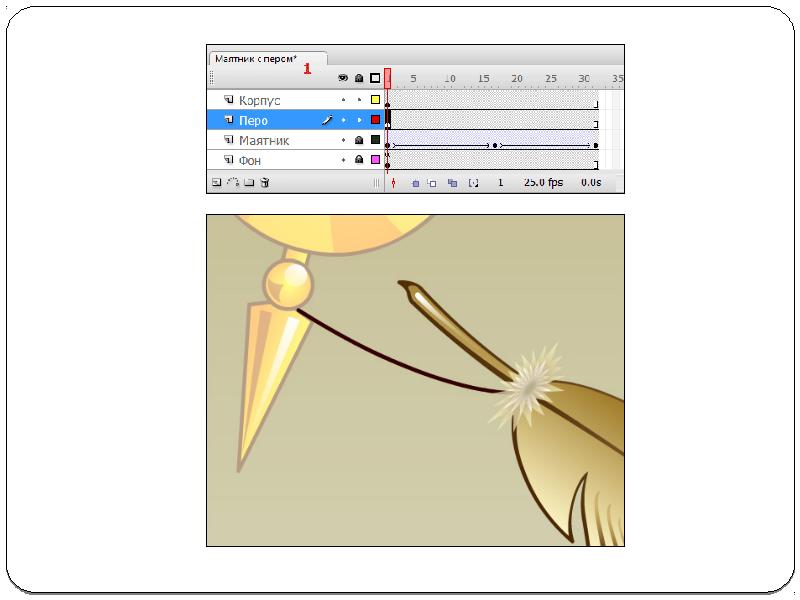
- 6. We will create a new layer between layers "Pendulum" and "Pen"
- 7. Later we will supply this thread with animation of the form
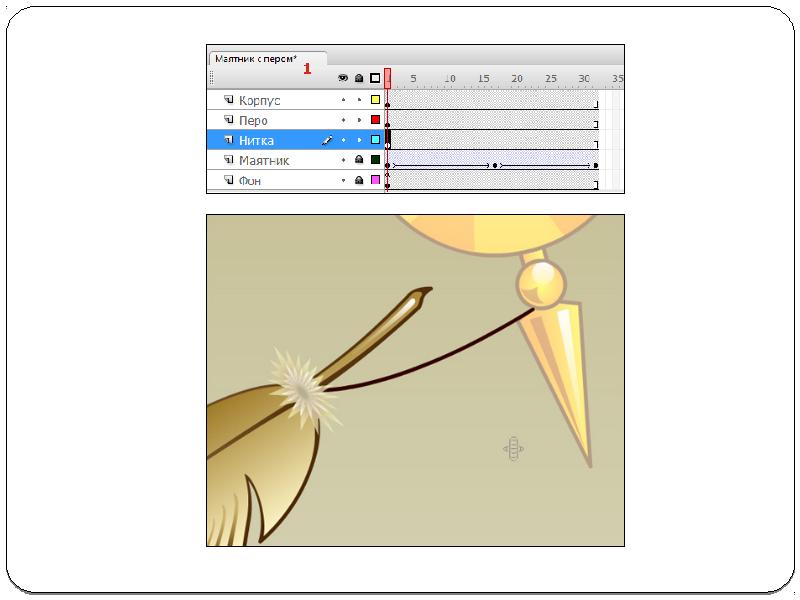
- 9. Step 4. Further, as it isn't difficult to guess, we will
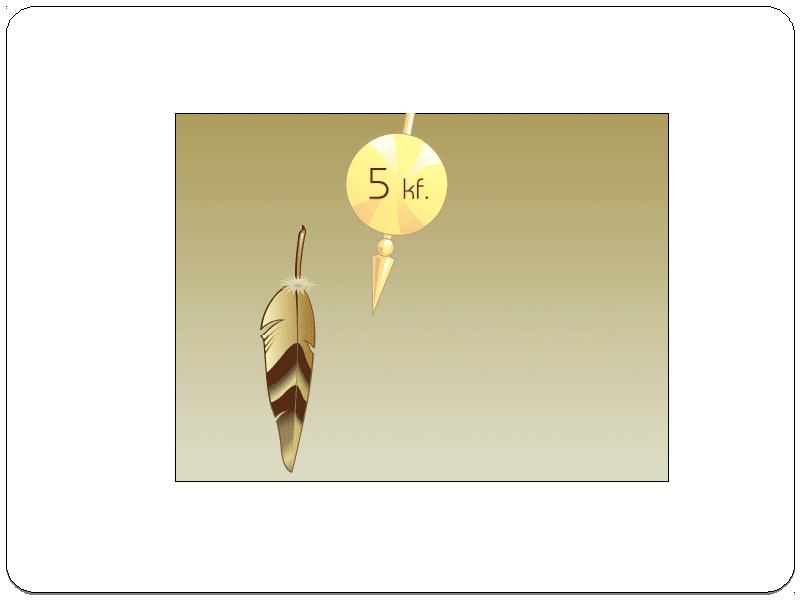
- 11. Step 5. Now it is possible to start creation of new
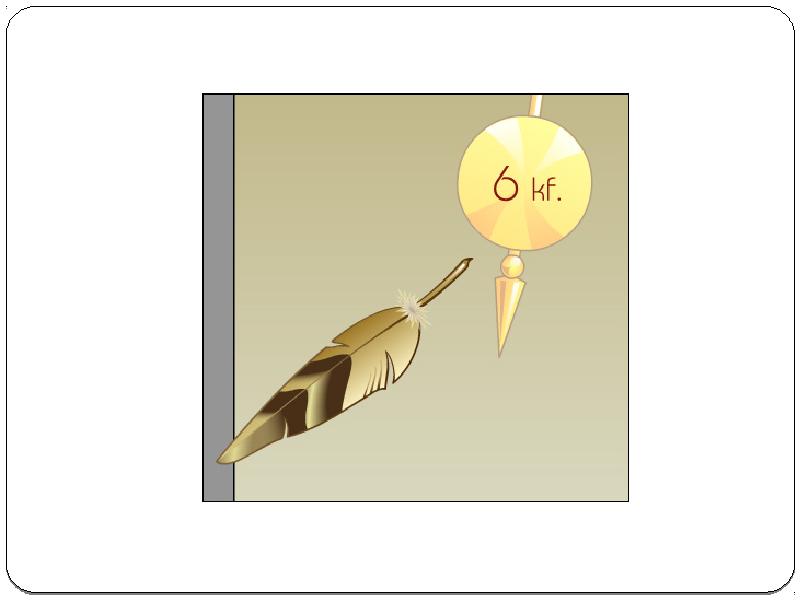
- 12. Besides that the pendulum already began at this time the movement
- 13. The thread connecting them will lose a tension and will take
- 15. Step 5. You, for certain, paid attention that a pen object,
- 16. In this case (if it isn't part of a creative intention),
- 17. Delete animation of movement from 5 key frames if you assigned
- 20. Step 6. Now in a layer "Pen" we will assign animation
- 21. It is better to make it now that then it was
- 22. The curve of speed has in the beginning, at 6 key
- 26. Step 7. We pass to animation of the form of object
- 27. Peaks of the line traded places and, any of them, didn't
- 29. Step 8. Select all key frames with 5 on 14 and
- 31. Скачать презентацию


,")


Слайды и текст этой презентации
Слайд 1
Описание слайда:
Pendulum with a pen
Слайд 2
Описание слайда:
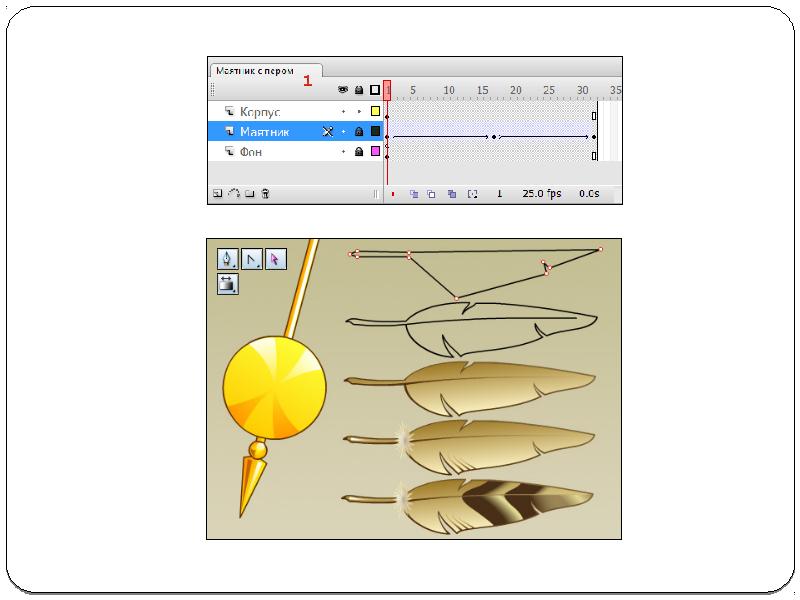
Step 1. Create a new layer over a layer "Pendulum" and call it - "Pen". By means of the tool a pen of PEN Tool and its support functions draw a pen in the first key frame of this layer, on the example of an illustration is lower. The turned-out result convert "Pen" in the character and in this character you can already conjure over a pen coloring.
Слайд 3
Описание слайда:
Слайд 4
Описание слайда:
By means of the instrument of the free transformation of Free Transform Tool (Q), "Pen" set a point of registration of the character in center of a "down" bundle in the plumage base.
Слайд 5
Описание слайда:
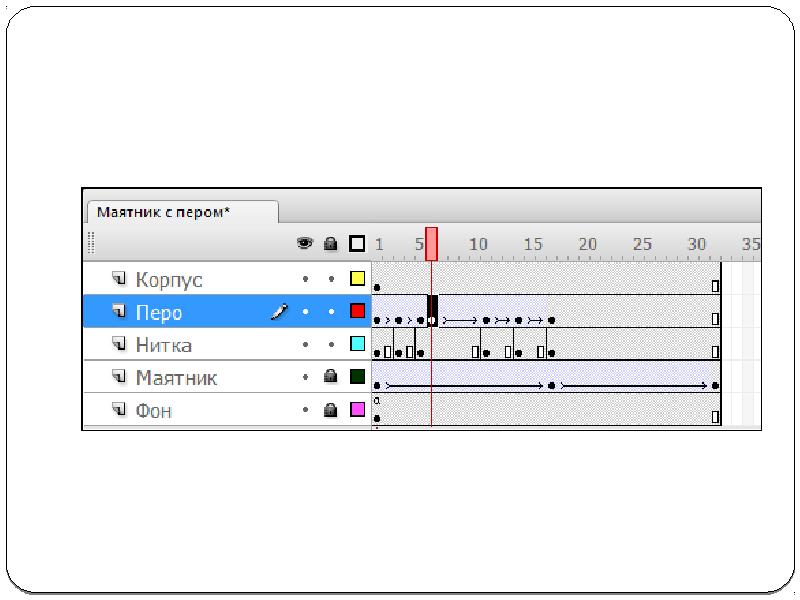
Step 3. As a binding element between a pen and a pendulum at us the thin lace or a thick thread to whom that is pleasant more will appear. We won't give the volume or any complex structure to this object especially as at such scale of all this and it won't be visible, simply we use a segment of the line of dark brown color.
Слайд 6
Описание слайда:
We will create a new layer between layers "Pendulum" and "Pen" in which by means of the tool for creation of the Line Tool lines (N) we will draw a line from a point of registration of a pen to the upper part of a tip of a pendulum.
Слайд 7
Описание слайда:
Later we will supply this thread with animation of the form (Shape Tween) therefore it shouldn't be converted in the character. And if you drew it in the Object Drawing mode (J), break it on making a command of the Break Apart shortcut menu (Ctrl+B), and give it slightly curved form as it is shown on an illustration below.
Слайд 8
Описание слайда:
Слайд 9
Описание слайда:
Step 4. Further, as it isn't difficult to guess, we will create the similar provision of a pen and thread concerning a pendulum when it is in extreme right situation. For this purpose we will select in layers "Pen" and "Thread" the 17th frame of the time diagram and we convert them in key a command of the Convert to Keyframes shortcut menu. Pen objects and "Thread" in these key frames, reflect across and place them in the appropriate places in a work space of a scene.
Слайд 10
Описание слайда:
Слайд 11
Описание слайда:
Step 5. Now it is possible to start creation of new key frames between 1 and 17 key frames. (From 17 to 32 frames we will use "mirror" copies with offset from the first half of a cycle). For descriptive reasons, I suggest to animate directly both objects – both "Pen" and "Thread". We select the third frames of the time diagram in both layers and we convert them in the key.
Слайд 12
Описание слайда:
Besides that the pendulum already began at this time the movement to the right, the pen continues to move by inertia to the left and it will appear at this moment approximately flush with a pendulum down.
Слайд 13
Описание слайда:
The thread connecting them will lose a tension and will take more curved form. In a work space of a scene give situation to a pen and the form a thread same, as shown in an illustration below. Do the same for frames – 5, 11, 14 (these are coinciding numbers of key frames for pen objects and "Thread", for the rest there will be some discrepancies).
Слайд 14
Описание слайда:
Слайд 15
Описание слайда:
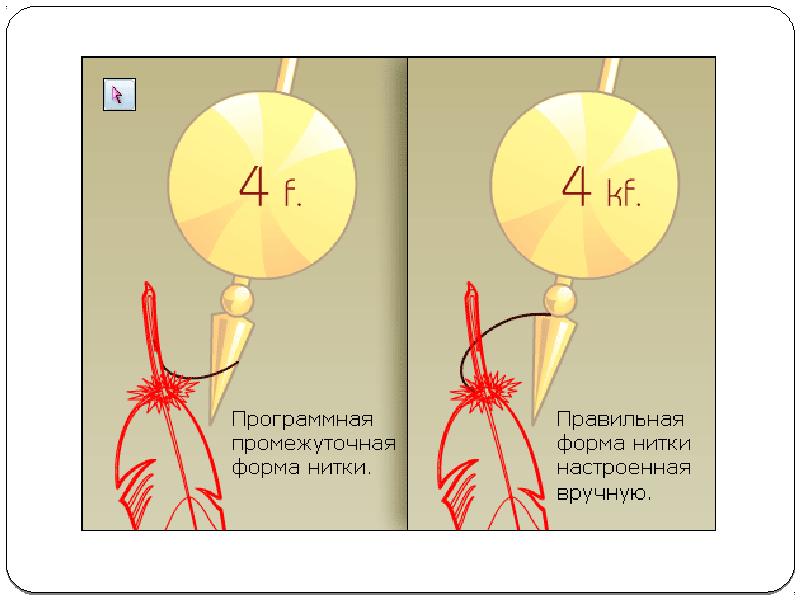
Step 5. You, for certain, paid attention that a pen object, agrees to the diagram given above, in key frames 5 and 11 has wider part of plumage below. If right now temporarily to assign animation of movement to the fifth key frame and to move the selector of frames along a chronometric ruler towards the eleventh key frame, you will see that the pen "is flattened", and in the 8th intermediate frame becomes invisible at all.
Слайд 16
Описание слайда:
In this case (if it isn't part of a creative intention), the additional key frame will help to avoid such visual error to us. During movement fast substitution will be imperceptible for an eye, and unwanted program transformations to us will manage to be avoided.
Слайд 17
Описание слайда:
Delete animation of movement from 5 key frames if you assigned it, convert the 6th frame of the time diagram in a key frame, and to a character pen object set situation in a scene, as shown in the right illustration is lower.
Слайд 18
Описание слайда:
Слайд 19
Описание слайда:
Слайд 20
Описание слайда:
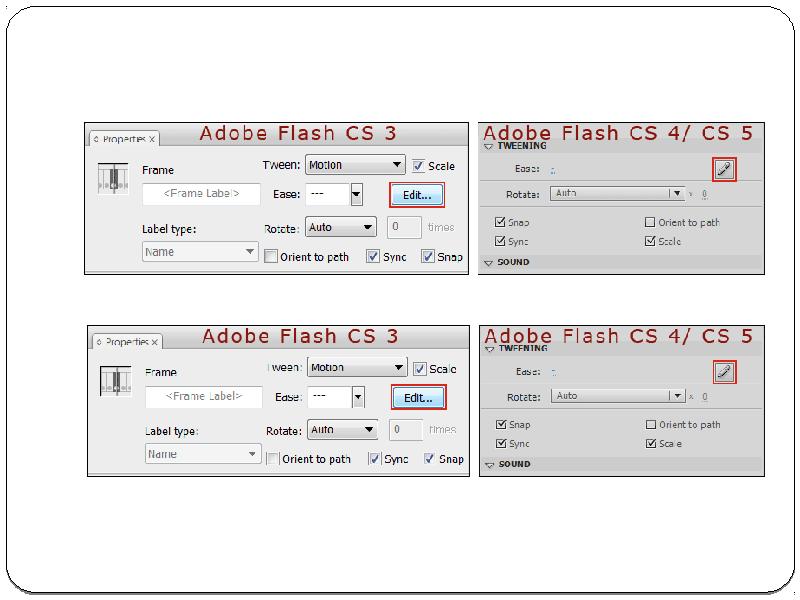
Step 6. Now in a layer "Pen" we will assign animation of type to all key frames of the first half of a cycle – the intermediate movement (Motion Tween, for CS 4, CS5 – Classic Tween) and we will set up acceleration/deceleration in a dialog box of Custom Ease In/Ease Out for a key frame 6.
Слайд 21
Описание слайда:
It is better to make it now that then it was simpler to decide on the form and location of a thread in future key frames and to synchronize its animation with animation of a pen and pendulum.
Слайд 22
Описание слайда:
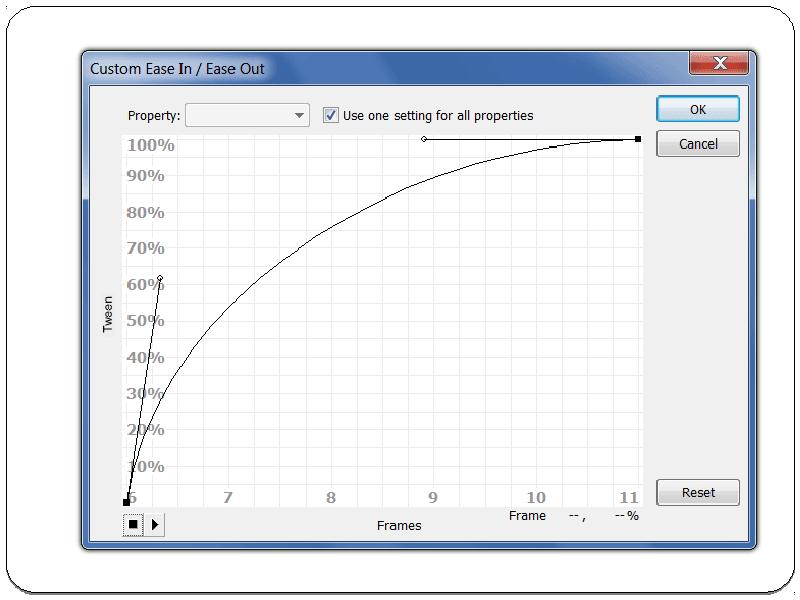
The curve of speed has in the beginning, at 6 key frames, the steep slope and to the 11th key frame, almost, horizontal direction that will provide a short state of weightlessness to a pen until then when the thread is stretched and will pull it again after a pendulum. But thus, flying up up, the pen by inertia displaces a little to the right.
Слайд 23
Описание слайда:
Слайд 24
Описание слайда:
Слайд 25
Описание слайда:
Слайд 26
Описание слайда:
Step 7. We pass to animation of the form of object "Thread" in the first half of a cycle. Assign to 1 and 3 key frames a layer "Thread" animation of the form of type – Shape Tween. Moving the selector of frames along a chronometric ruler, you will note that between 1 and 3 key frames in change of the form of problems didn't arise, in the 4th frame the program introduced the amendments and output the average form of a thread.
Слайд 27
Описание слайда:
Peaks of the line traded places and, any of them, didn't appear in the right place. We will quickly correct this defect. Convert in a key 4th frame of a layer "Thread" and with the help of the instrument of editing subobjects of Subselection Tool (A) move peaks on a tip of a pendulum and under a down bundle on a pen. Vectorial pointing devices give the form of the line such, as shown in the right illustration is lower.
Слайд 28
Описание слайда:
Слайд 29
Описание слайда:
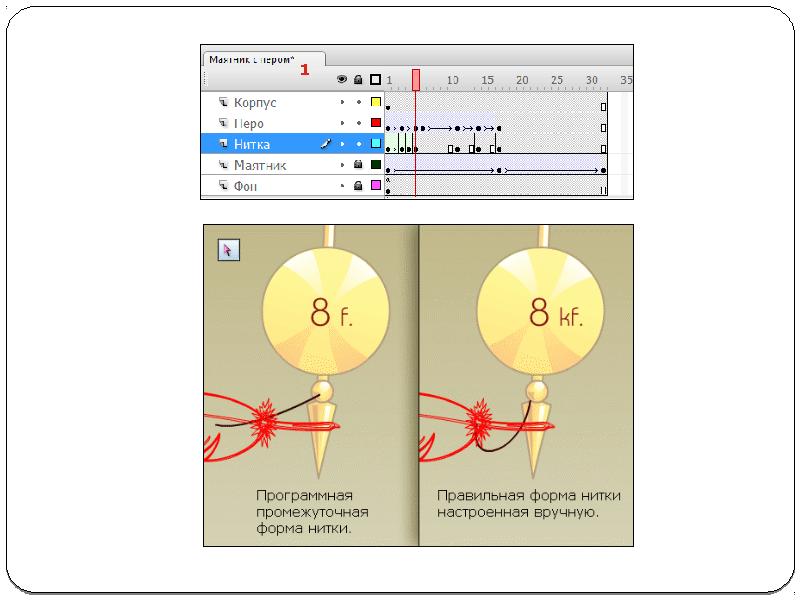
Step 8. Select all key frames with 5 on 14 and set to them animation of the form of type - Shape Tween. As with 6 on 11 key frames we regulated motion speed of a pen, in this interval synchronization with a thread was broken. To correct it, convert the 8th frame in a layer "Thread" in key and by means of the Subselection Tool tool (A) set up the form of the line of a thread, as well as on the right illustration is lower.
Слайд 30
Описание слайда:
Скачать презентацию на тему Pendulum with a pen можно ниже: